This tutorial tells you about implementation and other features provided in the implementation section .
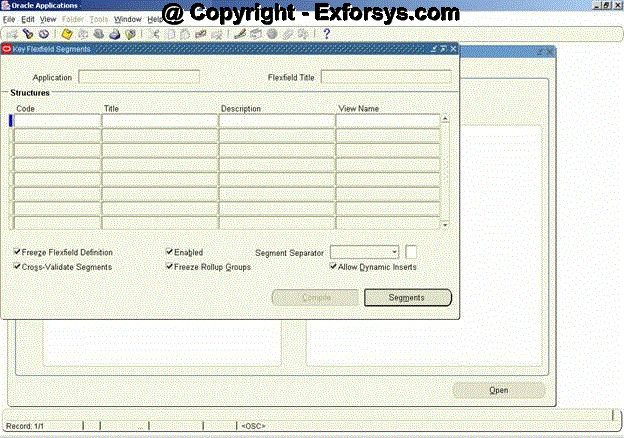
Figure 5. Key Flexfield Segments Form
Lets say you are defining the structure for an Accounting Flexfield. Query for the Flexfield Title “Accounting Flexfield” using the Flexfield Title window as shown in figure 5 above. If there are already existing structures for Accounting Flexfields, they would be listed in the Structures window as shown in figure 6 below.
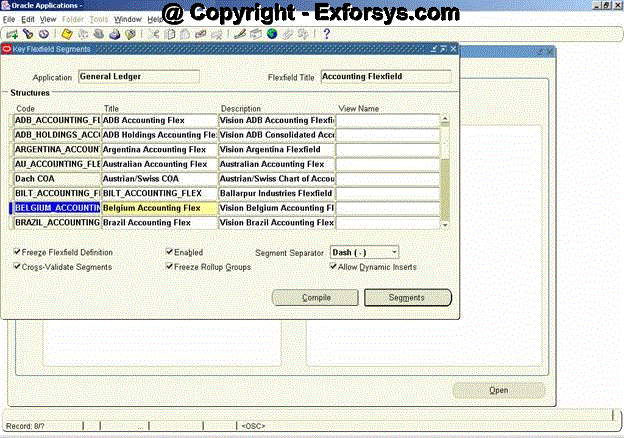
Figure 6. Listing of existing structures for Accounting Key Flexfield
Lets say you want to define a new structure for the Accounting Flexfield with the structure code as “NEW_ACCOUNTING_STRUCTURE”. Enter the code name in the Code window and the title as “New Accounting Flexfield Struc” in the Title window. Enter an optional description for the new structure which may include the purpose of the new structure. Save the changes. The form would look like as shown in figure 7 below.
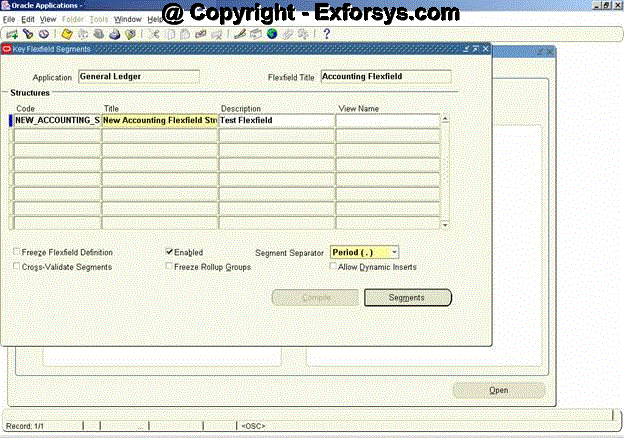
Figure 7. Structure definition for a new Accounting Flexfield
There are few check buttons on the form in the figure 7 above which can be left unchecked/checked as shown in the figure above.
The Enabled checkbox is checked by default. You can optionally uncheck it. You cannot delete a Key flexfield structure, but you can disable it by unchecking the Enabled checkbox. Next, you may select a Segment Separator other than the default period. Your choices are period, dash, pipe, or any custom character. You must have a segment separator.
Next, you can select whether you want to Cross-Validate Segments. Unchecking this checkbox will disable cross-validation for this Key flexfield structure. You can then identify whether you want to Freeze Rollup Groups. If you mark this checkbox, you will not be able to change the assigned rollup groups in the Define Segment Values form. As a last step, you can determine whether you want to Allow Dynamic Inserts for Key flexfield structures. If you do not allow dynamic inserts, you must create all flexfield combinations in the combination form.
You can freeze your flexfield structure by checking the Freeze Flexfield Definition checkbox. Once frozen, you can only make very limited changes to the flexfield structure definition. If you need to change the flexfield structure definition, first uncheck the Freeze Flexfield Definition checkbox and make the changes. Next, reactivate the Freeze Flexfield Definition checkbox. You will receive a warning message that tells you that unfreezing this flexfield and making changes to the segment definitions could affect the validity of the data already existing for this flexfield. Changing a Key flexfield structure will not update existing flexfield data. Do not freeze your flexfield structure yet, as you have not entered the segment attributes for your flexfield structure.
Once the above fields are defined click on the Segments button at the bottom of the form. The new form would look like as shown in figure 8 below. Enter the values as shown in the form below. You can use the already defined Value Sets for the various segments. If you have not defined them earlier, they can be created using the Value Set button at the bottom of the form. Save the changes. To assign a flexfield qualifier to each segment, select the segment on the form and then click on the Flexfield Qualifiers button as the next step.
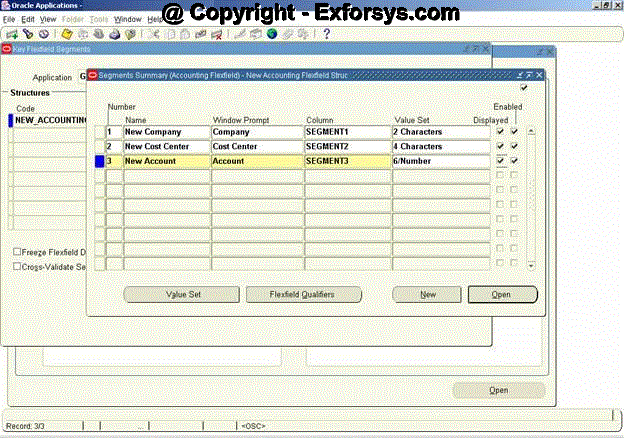
Figure 8. Accounting Flexfield Segment Structure form
Select the New Company segment and click on Flexfield Qualifier button. Check the Balancing Segment for the New Company structure as the flexfield qualifier. The form would look like as shown in figure 9 below. Follow the same steps to choose the flexfield qualifiers for the remaining 2 segments. Check Cost Center Segment for New Cost Center and Natural Account for New Account segments respectively. Save the changes and close the Structure form.
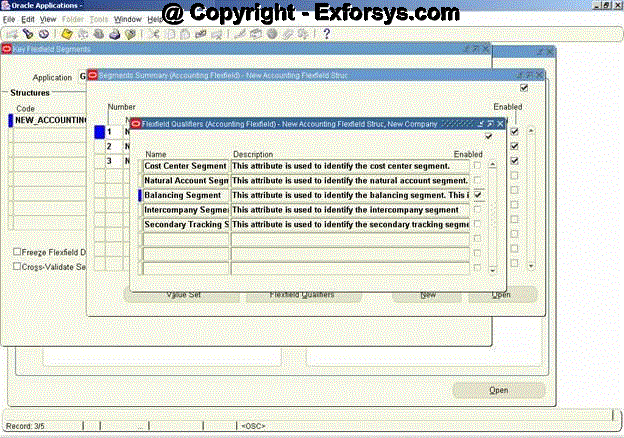
Figure 9. Flexfield Qualifier form
As the next step, the form shown in figure 7 would be visible now. Click on the Freeze Flexfield Definition button. Then compile the flexfield structure. You can compile your flexfield structure by hitting the Compile button. Compiling a flexfield structure will automatically save the flexfield structure. You will see the dialogue box as shown in figure 10 below. Choose OK on the dialogue box.
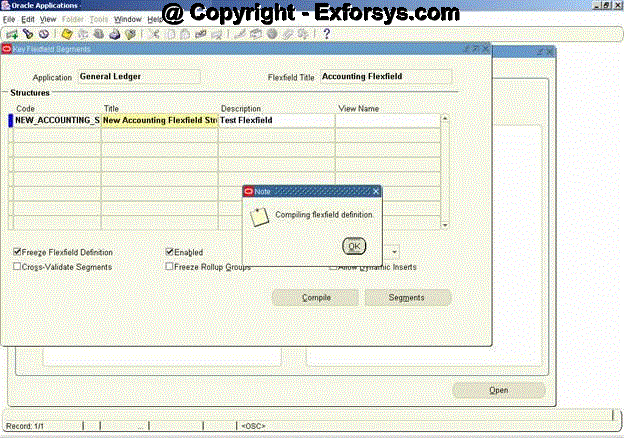
Figure 10. Compiling Flexfield Definition
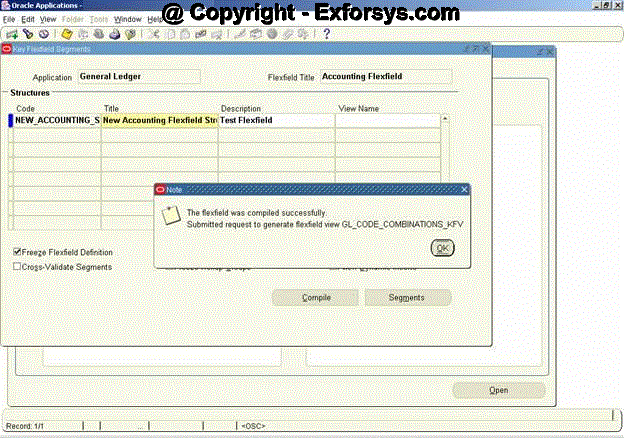
Figure 11. Dialogue box for compilation of flexfield structure
Click on OK and the flexfield definition would be saved.
Implementing Flex fields
Key Flexfield
The basic steps in defining a key Flexfields are as given below. You may or may not use all the steps. The detailed explanation is being followed after the steps.- Identifying Key flexfields that are required for you Oracle Applications installation
- Designing a Key flexfield structure
- Selecting the appropriate Key flexfield to define
- Defining structure information for the Key flexfield
- Defining segment attributes
- Defining flexfield qualifiers
- Defining segment qualifiers
- Implementing optional features as needed
Figure 5. Key Flexfield Segments Form
Lets say you are defining the structure for an Accounting Flexfield. Query for the Flexfield Title “Accounting Flexfield” using the Flexfield Title window as shown in figure 5 above. If there are already existing structures for Accounting Flexfields, they would be listed in the Structures window as shown in figure 6 below.
Figure 6. Listing of existing structures for Accounting Key Flexfield
Lets say you want to define a new structure for the Accounting Flexfield with the structure code as “NEW_ACCOUNTING_STRUCTURE”. Enter the code name in the Code window and the title as “New Accounting Flexfield Struc” in the Title window. Enter an optional description for the new structure which may include the purpose of the new structure. Save the changes. The form would look like as shown in figure 7 below.
Figure 7. Structure definition for a new Accounting Flexfield
There are few check buttons on the form in the figure 7 above which can be left unchecked/checked as shown in the figure above.
The Enabled checkbox is checked by default. You can optionally uncheck it. You cannot delete a Key flexfield structure, but you can disable it by unchecking the Enabled checkbox. Next, you may select a Segment Separator other than the default period. Your choices are period, dash, pipe, or any custom character. You must have a segment separator.
Next, you can select whether you want to Cross-Validate Segments. Unchecking this checkbox will disable cross-validation for this Key flexfield structure. You can then identify whether you want to Freeze Rollup Groups. If you mark this checkbox, you will not be able to change the assigned rollup groups in the Define Segment Values form. As a last step, you can determine whether you want to Allow Dynamic Inserts for Key flexfield structures. If you do not allow dynamic inserts, you must create all flexfield combinations in the combination form.
You can freeze your flexfield structure by checking the Freeze Flexfield Definition checkbox. Once frozen, you can only make very limited changes to the flexfield structure definition. If you need to change the flexfield structure definition, first uncheck the Freeze Flexfield Definition checkbox and make the changes. Next, reactivate the Freeze Flexfield Definition checkbox. You will receive a warning message that tells you that unfreezing this flexfield and making changes to the segment definitions could affect the validity of the data already existing for this flexfield. Changing a Key flexfield structure will not update existing flexfield data. Do not freeze your flexfield structure yet, as you have not entered the segment attributes for your flexfield structure.
Once the above fields are defined click on the Segments button at the bottom of the form. The new form would look like as shown in figure 8 below. Enter the values as shown in the form below. You can use the already defined Value Sets for the various segments. If you have not defined them earlier, they can be created using the Value Set button at the bottom of the form. Save the changes. To assign a flexfield qualifier to each segment, select the segment on the form and then click on the Flexfield Qualifiers button as the next step.
Figure 8. Accounting Flexfield Segment Structure form
Select the New Company segment and click on Flexfield Qualifier button. Check the Balancing Segment for the New Company structure as the flexfield qualifier. The form would look like as shown in figure 9 below. Follow the same steps to choose the flexfield qualifiers for the remaining 2 segments. Check Cost Center Segment for New Cost Center and Natural Account for New Account segments respectively. Save the changes and close the Structure form.
Figure 9. Flexfield Qualifier form
As the next step, the form shown in figure 7 would be visible now. Click on the Freeze Flexfield Definition button. Then compile the flexfield structure. You can compile your flexfield structure by hitting the Compile button. Compiling a flexfield structure will automatically save the flexfield structure. You will see the dialogue box as shown in figure 10 below. Choose OK on the dialogue box.
Figure 10. Compiling Flexfield Definition
Figure 11. Dialogue box for compilation of flexfield structure
Click on OK and the flexfield definition would be saved.
hi , I have followd the same..but newly created structure is not appearing when I was trying to add values in it
ReplyDelete