Thursday, April 14, 2011

Understanding data flow for “Standard Order”

Normally standard sales order can be split into nine sub steps , which jointly carried out by some module like INV,OM, Pricing, Shipping and AR. Lets take each sub steps with data flow conditions. These are based out of the flow which is available in 11.5.10.2.
1. Order Entry
This is first stage when Order in enter in system.When the order is entered it basically create a record in order headers and Order Lines table.
  • oe_order_headers_all (Here the flow_status_code as entered)
  • oe_order_lines_all (flow_status_code as entered) ( order number is generated)
    dataflow
2.Order Booking
This is next stage , when Order which is entered in step 1 is booked and Flow status changed from Entered to Booked.At this stage , these table get affected.
  • oe_order_headers_all (flow_status_code as booked ,booked_flag updated)
  • oe_order_lines_all (flow_status_code as awaiting shipping, booked_flag updated)
  • wsh_new_deliveries (status_code OP open)
  • wsh_delivery_details (released_status ‘R’ ready to release)
Same time, Demand interface program runs in background And insert into inventory tables mtl_demand
3. Reservation
This step is required for doing reservations SCHEDULE ORDER PROGRAM runs in the background and quantities are reserved.Once this program get successfully get completed , the mtl_reservations table get updated.
4. Pick Release
Ideally pick release is the process which is defined in which the items on the sales order are taken out from inventory.
Normally pick release SRS program runs in background . Once the program get completed these are the table get affected:
  • oe_order_lines_all (flow_status_code ‘PICKED’ )
  • wsh_delivery_details (released_status ‘S’ ‘submitted for release’ )
  • mtl_txn_request_headers
  • mtl_txn_request_lines
    (move order tables.Here request is generated to move item from saleble to staging sub inventory)
  • Mtl_material_transactions_temp (link to above tables through move_order_header_id/line_id
5.Pick Confirm
Items are transferred from saleble to staging Subinventory.
  • mtl_material_transactions
  • mtl_transaction_accounts
  • wsh_delivery_details (released_status ‘Y’‘Released’ )
  • wsh_delivery_assignments
6.Ship Confirm
Here ship confirm interface program runs in background . Data removed from wsh_new_deliveries
  • oe_order_lines_all (flow_status_code ‘shipped’)
  • wsh_delivery_details (released_status ‘C’ ‘Shipped’)
  • mtl_transaction_interface
  • mtl_material_transactions(linked through Transaction source header id)
  • mtl_transaction_accounts
  • Data deleted from mtl_demand,mtl_reservations
  • Item deducted from mtl_onhand_quantities
7.Enter Invoice
This is also called Receivables interface, that mean information moved to accounting area for invoicing details.
  • Invoicing workflow activity transfers shipped item information to Oracle Receivables.
  • ra_interface_lines_all (interface table into which the data is transferred from order management)T
  • Then Autoinvoice program imports data from this
  • Table which get affected into this stage are recievables base table.
    • ra_customer_trx_all (cust_trx_id is primary key to link it to trx_lines table and trx_number is the invoice number)
    • ra_customer_trx_lines_all (line_attribute_1 and line_attribute_6 are linked to header_id (or order number) and line_id of the orders)
8.Complete Line
In this stage order line leval table get updated with Flow status and open flag.
  • oe_order_lines_all (flow_status_code ‘shipped’, open_flag “N”)
9.Close Order
This is last step of Order Processing . In this stage only oe_order_lines_all table get updated.
These are the table get affected in this step.
  • oe_order_lines_all (flow_status_code ‘closed’,open_flag “N”)
These are the typically data flow of a order to cash model for a standard order.

Tuesday, April 5, 2011

Welcome to R12 Account Payable

As we learnt during Release 12, the E-Business Suite has couple of new products like Subledger Accounting, E-Business Tax thus significant changes have been observed in Account Payable data module as some of functionality is shared by some other products. Thus it is important to understand what is new. I would like to briefly outline the details of some of new changes and underlying impact on the objects. More details can be found in R12 release documents published by Oracle a month ago.
Let’s have a dissection view of R12 payable, with some of its core objects
Supplier
We have seen in 11i
  • Suppliers defined in AP.
  • Supplier contacts replicated for each supplier site.
Where as in R12
  • Supplier becomes as TCA Party.
  • Suppliers Sites as TCA Party Site for each distinct address.
  • Contacts for each supplier/address , it means Single supplier address and contact can be leveraged by multiple sites, for each OU
    • A single change to an address can be seen instantly by all OUs
    • No longer need to manually 'push' updates across OUs.This can be best understood by the figure below.
SuppliersContact
Then the question is what will happen if any one can come from existing financial products. The Impact from upgrade can summarize as:
1. When we upgrade supplier tables replaced with backward compatible views.
2. One party site for each distinct supplier site address
Country and address line1 are required, this is because creation of suppliers in Party in TCA data model would requires Country and address information, but it also understood if there is no country or address line 1 specified for a supplier site in cases when upgrades takes place, Payables derives the country based on the most frequently used operating unit of the Supplier's historical transactions.
3. Employee as suppliers: address NOT migrated to party site in TCA remains in Oracle HR for data security reasons.
As we know in 11i employees are part of internal supplier's record in order for Oracle Payables to create payments for their expense reports. Employees defined in Oracle Human Resources and associated with an Oracle Payables supplier record have existing party information. During the upgrade, Oracle Payables updates the existing party information to have a party usage of supplier but it does not migrate the employee address to the party site in TCA, they remain in Oracle Human Resources for data security reasons.
4. Utilize TCA Party relationships for franchise or subsidiary and its parent company.
Invoice
Till 11i version, we have seen invoices:
  • Had only distributions line.
  • Allocation of freight and special charges are captured at the distribution level only
  • Tax and payment and Project accounting Payment was captured through global Descriptive Flexfields.
But in R12,
1. Invoice Lines as a new additional line accommodated in Invoice data model.
12RInvoice
Because of introduction of invoice line there is significant improvement of data flow with n other oracle modules like
  • Fixed Asset - Asset Tracking
  • Business Tax - Tax line
  • Payment - Payment
  • SubLedger Accounting - Accounting

2. Allocate freight and special charges are captured to the lines on the invoice
3. Invoice distributions created at the maximum level of detail similar to 11i.
4. Core functionality

The impact with Upgrade can be summarized as:
1. One invoice line for every distribution in 11i
2. Sub Ledger Accounting requires that Payables transform the invoice distributions to be stored at the maximum level of detail
3. Global Descriptive Flexfields migrated to named columns.
          That's means functional testing is more required while upgrade takes place.
Banks and Bank Details
Now a days corporate treasury role has been greatly enhanced thus picking up a global bank as partner for all banking need is demand of time in global working model. The recent couple of years have seen drastic increase in acquisition and merger of company thus global working as well as global instance get popularity in ERP areana, and this is one of reason of the reason bank data model has been significant changes from 11 to 11i and 11i to R12.
Internal Bank AccountsIn 11i we have seen internal Banks defined in AP and that is shared by AP/AR/CE, Payroll and Treasury and they are bank accounts often replicated in multiple OUs
Where as in R12,
  • Bank and Branch become part of TCA Parties.
  • Internal Bank Account in Cash Management which is owned by a Legal Entity. Here the Operating units have granted usage rights.
Suppliers Bank Accounts
In 11i
  • Banks/Branches defined in AP
  • Bank accounts often replicated in multiple OUs Before
R12
  • Suppliers, Banks and Branches are defined as Parties in TCA
  • Supplier (party's) payment information and all payment instruments (Bank Accounts, Credit Cards) moved into Oracle Payments.
The typical data model for bank can be summarized as:
R12BankDataModel
Impact of Upgrade
1. With Upgrade banks and branches migrated to TCA parties
2. Banks merged if the following attributes are all the same:

  • a. Bank Number
    b. Institution type
    c. Country
    d. Bank admin email
    e. Bank name alt
    f. Tax payer ID
    g. Tax reference number
    h. Description, Effective dates
3. Bank accounts, bank account uses are migrated into cash management.
4. Transactions are stamped with the bank account uses identifiers as part of the upgrade

 Integration with Oracle E-Business Tax
In 11i
  • Oracle standard functionality was based out of User which determines tax by assigning Tax Codes at line level of invoice and Tax rules was controlled at underline code.
  • There was global descriptive flex fields were captured for country-specific tax attributes.
  • More importanta most of the setup performed at OU level.
In R12
  • A new module eBusinessTax determines tax based on facts about each transaction, this is reason why Oracle has introduced additional line information at invoice level.
  • The module "ebusiness Tax" set and configure Tax rules which can be viewed
  • Tax attributes collected in fields on key entities
  • Configure tax rules once per regime and share with your legal entities
Impact of Upgrade
1. Payables Tax setup, Tax Code defaulting rules defined per OU are migrated to eBusiness Tax.
2. OUs migrated to tax content owner in R12
3. Tax information in tax codes are transformed to Regime-Rate flow.
4. E-Business Tax takes information from the AP invoice lines and creates summary and detail tax lines in the E-Business Tax repository.
Multi Org Access Control
MOAC is new enhancement to the Multiple Organizations feature of Oracle Applications.
This feature enables user to access data from one or many Operating Units while within a set given responsibility. Due to this change, all processing and some Reporting in Oracle Payables is available across Operating Units from a single Applications responsibility. Hence you can isolate your transaction data by Operating unit for security and local level compliance while still enabling shared Service centre processing.Data security is maintained using the Multiple Organizations Security Profile, defined in Oracle HRMS, which specifies a list of operating units and determines the data access privileges for a user.
Impact of UpgradeR12 Upgrade does not automatically create security profiles, thus is important if any one want to use Multiple Organizations Access Control, the first things is to define security profiles, then link them to respective responsibilities or users.

R12 Supplier Bank – Techno Functional Guide

Three banks you can manage in EBS
  • House Bank or internal bank
  • External bank for supplier and Customer
    • Supplier (or External) bank accounts are created in Payables, in the Supplier Entry forms. Navigate to Suppliers -> Entry. Query or create your supplier. Click on Banking Details and then choose Create. After you have created the bank account, you can assign the bank account to the supplier site.
  • Intermediary bank for SEPA payment : An intermediary bank is a financial institution that as a relationship with the destination bank (in this case the supplier bank account you are setting up) which is not a direct correspondent of the source bank (the disbursement bank in AP/Payments), which facilities the funds transfer to the destination bank.
You can enter intermediary bank accounts on Suppliers->Entry->Banking Details->Bank Account Details
This is important when paying a foreign supplier from a domestic disbursement account, there may be an intermediary bank used, and it would be set up on the supplier bank account. Although the intermediary bank UI is owned by Payments, the implementation is as embeddable UI components in pages owned by i-supplier Portal (suppliers) and AR/Collections (customers).
dgreybarrow Some information
  1. The supplier bank account information is in the table: IBY_EXT_BANK_ACCOUNTS, the bank and bank branches information is in the table HZ_PARTIES.
  2. Creating a supplier in AP now creates a record in HZ_PARTIES. In the create Supplier screen, you will notice that that Registry_id is the party_number in HZ_Parties.
  3. The table hz_party_usg_assignments table stores the party_usage_code SUPPLIER, and also contains the given party_id for that supplier. Running this query will return if customer was a SUPPLIER or CUSTOMER
  4. Payment related details of supplier are also inserted in iby_external_payees_all as well as iby_ext_party_pmt_mthds
  5. IBY_EXT_BANK_ACCOUNTS, the bank and bank branches information is in the table: HZ_PARTIES.
  6. The master record that replaces PO_VENDORS is now AP_SUPPLIERS. PO_VENDORS is a view that joins AP_SUPPLIERS and HZ_PARTIES.
  7. The table that hold mappings between AP_SUPPLIERS.VENDOR_ID and HZ_PARTIES.PARTY_ID is PO_SUPPLIER_MAPPINGS. Query by party_id.
  8. The bank branch number can be found in the table: HZ_ORGANIZATION_PROFILES .The HZ_ORGANIZATION_PROFILES table stores a variety of information about a party. This table gets populated when a party of the Organization type is created.
dgreybarrowER Diagram(Bank Model)

suplier bank 
Oracle Table Involved
  • IBY_EXTERNAL_PAYEES_ALL : This stores supplier information and customer information
  • IBY_EXT_BANK_ACCOUNTS : This storage for bank accounts
  • IBY_EXT_PARTY_PMT_MTHDS : This storage for payment method usage rules.
  • IBY_CREDITCARD : stores the credit card information for a customer
  • IBY_EXT_BANK_ACCOUNTS :This Stores external bank accounts . These records have bank_account_type = Supplier
  • IBY_ACCOUNT_OWNERS :stores the joint account owners of a bank account
  • IBY_PMT_INSTR_USES_ALL : This stores data from AP_BANK_ACCOUNT_USES_ALL for payment instruments assignments .This information is stored in the following iPayment (IBY) tables:

Monday, March 14, 2011

Putty commands


PuTTY Commands
SNS 5/20/2008
 
PuTTY Commands: 
 
ls - to list files in a directory:
cd - change directory
cp - copy a file
mv - move a file 
mv - move a file 
mkdir - make directory
pwd - show your current location
whoami - find out which user you are
date - display date and time
man - most important of all commands (opens manual pages for other commands):
q - quit or exit an application 
An A-Z Index of the Linux BASH command line
alias    Create an alias
apropos  Search Help manual pages (man -k)
awk      Find and Replace text, database sort/validate/index
break    Exit from a loop
builtin  Run a shell builtin
bzip2    Compress or decompress named file(s)
 
cal      Display a calendar
case     Conditionally perform a command
cat      Display the contents of a file
cd       Change Directory
cfdisk   Partition table manipulator for Linux
chgrp    Change group ownership
chmod    Change access permissions
chown    Change file owner and group
chroot   Run a command with a different root directory
cksum    Print CRC checksum and byte counts
clear    Clear terminal screen
cmp      Compare two files
comm     Compare two sorted files line by line
command  Run a command - ignoring shell functions
continue Resume the next iteration of a loop
cp       Copy one or more files to another location
cron     Daemon to execute scheduled commands
crontab  Schedule a command to run at a later time
csplit   Split a file into context-determined pieces
cut      Divide a file into several parts
 
date     Display or change the date & time
dc       Desk Calculator
dd       Data Dump - Convert and copy a file
ddrescue Data recovery tool
declare  Declare variables and give them attributes
df       Display free disk space
diff     Display the differences between two files
diff3    Show differences among three files
dig      DNS lookup
dir      Briefly list directory contents
dircolors Colour setup for `ls'
dirname  Convert a full pathname to just a path
dirs     Display list of remembered directories
du       Estimate file space usage
 
echo     Display message on screen
egrep    Search file(s) for lines that match an extended expression
eject    Eject removable media
enable   Enable and disable builtin shell commands
env      Environment variables
ethtool  Ethernet card settings
eval     Evaluate several commands/arguments
exec     Execute a command
exit     Exit the shell
expand   Convert tabs to spaces
export   Set an environment variable
expr     Evaluate expressions
 
false    Do nothing, unsuccessfully
fdformat Low-level format a floppy disk
fdisk    Partition table manipulator for Linux
fgrep    Search file(s) for lines that match a fixed string
file     Determine file type
find     Search for files that meet a desired criteria
fmt      Reformat paragraph text
fold     Wrap text to fit a specified width.
for      Expand words, and execute commands
format   Format disks or tapes
free     Display memory usage
fsck     File system consistency check and repair
ftp      File Transfer Protocol
function Define Function Macros
 
gawk     Find and Replace text within file(s)
getopts  Parse positional parameters
grep     Search file(s) for lines that match a given pattern
groups   Print group names a user is in
gzip     Compress or decompress named file(s)
 
hash     Remember the full pathname of a name argument
head     Output the first part of file(s)
history  Command History
hostname Print or set system name
 
id       Print user and group id's
if       Conditionally perform a command
ifconfig Configure a network interface
import   Capture an X server screen and save the image to file
install  Copy files and set attributes
 
join     Join lines on a common field
 
kill     Stop a process from running
 
less     Display output one screen at a time
let      Perform arithmetic on shell variables
ln       Make links between files
local    Create variables
locate   Find files
logname  Print current login name
logout   Exit a login shell
look     Display lines beginning with a given string
lpc      Line printer control program
lpr      Off line print
lprint   Print a file
lprintd  Abort a print job
lprintq  List the print queue
lprm     Remove jobs from the print queue
ls       List information about file(s)
lsof     List open files
 
make     Recompile a group of programs
man      Help manual
mkdir    Create new folder(s)
mkfifo   Make FIFOs (named pipes)
mkisofs  Create an hybrid ISO9660/JOLIET/HFS filesystem
mknod    Make block or character special files
more     Display output one screen at a time
mount    Mount a file system
mtools   Manipulate MS-DOS files
mv       Move or rename files or directories
 
netstat  Networking information
nice     Set the priority of a command or job
nl       Number lines and write files
nohup    Run a command immune to hangups
nslookup Query Internet name servers interactively
 
passwd   Modify a user password
paste    Merge lines of files
pathchk  Check file name portability
ping     Test a network connection
popd     Restore the previous value of the current directory
pr       Prepare files for printing
printcap Printer capability database
printenv Print environment variables
printf   Format and print data
ps       Process status
pushd    Save and then change the current directory
pwd      Print Working Directory
 
quota    Display disk usage and limits
quotacheck Scan a file system for disk usage
quotactl Set disk quotas
 
ram      ram disk device
rcp      Copy files between two machines.
read     read a line from standard input
readonly Mark variables/functions as readonly
remsync  Synchronize remote files via email
return   Exit a shell function
rm       Remove files
rmdir    Remove folder(s)
rsync    Remote file copy (Synchronize file trees)
 
screen   Terminal window manager
scp      Secure copy (remote file copy)
sdiff    Merge two files interactively
sed      Stream Editor
select   Accept keyboard input
seq      Print numeric sequences
set      Manipulate shell variables and functions
sftp     Secure File Transfer Program
shift    Shift positional parameters
shopt    Shell Options
shutdown Shutdown or restart linux
sleep    Delay for a specified time
sort     Sort text files
source   Run commands from a file `.'
split    Split a file into fixed-size pieces
ssh      Secure Shell client (remote login program)
strace   Trace system calls and signals
su       Substitute user identity
sum      Print a checksum for a file
symlink  Make a new name for a file
sync     Synchronize data on disk with memory
 
tail     Output the last part of files
tar      Tape ARchiver
tee      Redirect output to multiple files
test     Evaluate a conditional expression
time     Measure Program running time
times    User and system times
touch    Change file timestamps
top      List processes running on the system
traceroute Trace Route to Host
trap     Run a command when a signal is set(bourne)
tr       Translate, squeeze, and/or delete characters
true     Do nothing, successfully
tsort    Topological sort
tty      Print filename of terminal on stdin
type     Describe a command
 
ulimit   Limit user resources
umask    Users file creation mask
umount   Unmount a device
unalias  Remove an alias
uname    Print system information
unexpand Convert spaces to tabs
uniq     Uniquify files
units    Convert units from one scale to another
unset    Remove variable or function names
unshar   Unpack shell archive scripts
until    Execute commands (until error)
useradd  Create new user account
usermod  Modify user account
users    List users currently logged in
uuencode Encode a binary file 
uudecode Decode a file created by uuencode
 
v        Verbosely list directory contents (`ls -l -b')
vdir     Verbosely list directory contents (`ls -l -b')
vi       Text Editor
 
watch    Execute/display a program periodically
wc       Print byte, word, and line counts
whereis  Report all known instances of a command    
which    Locate a program file in the user's path. 
while    Execute commands
who      Print all usernames currently logged in
whoami   Print the current user id and name (`id -un')
Wget     Retrieve web pages or files via HTTP, HTTPS or FTP
 
xargs    Execute utility, passing constructed argument list(s)
yes      Print a string until interrupted
 
.        Run a command script in the current shell
###      Comment / Remark

Thursday, March 10, 2011

Oracle Apps Implementing Key Flex field and Descriptive Flex field

This tutorial tells you about implementation and other features provided in the implementation section .

Implementing Flex fields

Key Flexfield

The basic steps in defining a key Flexfields are as given below. You may or may not use all the steps. The detailed explanation is being followed after the steps.

  • Identifying Key flexfields that are required for you Oracle Applications installation
  • Designing a Key flexfield structure
  • Selecting the appropriate Key flexfield to define
  • Defining structure information for the Key flexfield
  • Defining segment attributes
  • Defining flexfield qualifiers
  • Defining segment qualifiers
  • Implementing optional features as needed
To define the key Flexfield structure, you need to open the Key Flexfield segment form as shown in the figure 5 below. The navigation path is Application Developer à Flexfield: Key à Segments.


Figure 5. Key Flexfield Segments Form

Lets say you are defining the structure for an Accounting Flexfield. Query for the Flexfield Title “Accounting Flexfield” using the Flexfield Title window as shown in figure 5 above. If there are already existing structures for Accounting Flexfields, they would be listed in the Structures window as shown in figure 6 below.


Figure 6. Listing of existing structures for Accounting Key Flexfield

Lets say you want to define a new structure for the Accounting Flexfield with the structure code as “NEW_ACCOUNTING_STRUCTURE”. Enter the code name in the Code window and the title as “New Accounting Flexfield Struc” in the Title window. Enter an optional description for the new structure which may include the purpose of the new structure. Save the changes. The form would look like as shown in figure 7 below.


Figure 7. Structure definition for a new Accounting Flexfield

There are few check buttons on the form in the figure 7 above which can be left unchecked/checked as shown in the figure above.

The Enabled checkbox is checked by default. You can optionally uncheck it. You cannot delete a Key flexfield structure, but you can disable it by unchecking the Enabled checkbox. Next, you may select a Segment Separator other than the default period. Your choices are period, dash, pipe, or any custom character. You must have a segment separator.

Next, you can select whether you want to Cross-Validate Segments. Unchecking this checkbox will disable cross-validation for this Key flexfield structure. You can then identify whether you want to Freeze Rollup Groups. If you mark this checkbox, you will not be able to change the assigned rollup groups in the Define Segment Values form. As a last step, you can determine whether you want to Allow Dynamic Inserts for Key flexfield structures. If you do not allow dynamic inserts, you must create all flexfield combinations in the combination form.


You can freeze your flexfield structure by checking the Freeze Flexfield Definition checkbox. Once frozen, you can only make very limited changes to the flexfield structure definition. If you need to change the flexfield structure definition, first uncheck the Freeze Flexfield Definition checkbox and make the changes. Next, reactivate the Freeze Flexfield Definition checkbox. You will receive a warning message that tells you that unfreezing this flexfield and making changes to the segment definitions could affect the validity of the data already existing for this flexfield. Changing a Key flexfield structure will not update existing flexfield data. Do not freeze your flexfield structure yet, as you have not entered the segment attributes for your flexfield structure.
Once the above fields are defined click on the Seg­ments button at the bottom of the form. The new form would look like as shown in figure 8 below. Enter the values as shown in the form below. You can use the already defined Value Sets for the various segments. If you have not defined them earlier, they can be created using the Value Set button at the bottom of the form. Save the changes. To assign a flexfield qualifier to each segment, select the segment on the form and then click on the Flexfield Qualifiers button as the next step.


Figure 8. Accounting Flexfield Segment Structure form

Select the New Company segment and click on Flexfield Qualifier button. Check the Balancing Segment for the New Company structure as the flexfield qualifier. The form would look like as shown in figure 9 below. Follow the same steps to choose the flexfield qualifiers for the remaining 2 segments. Check Cost Center Segment for New Cost Center and Natural Account for New Account segments respectively. Save the changes and close the Structure form.


Figure 9. Flexfield Qualifier form

As the next step, the form shown in figure 7 would be visible now. Click on the Freeze Flexfield Definition button. Then compile the flexfield structure. You can compile your flexfield structure by hitting the Compile button. Compiling a flexfield structure will automatically save the flexfield structure. You will see the dialogue box as shown in figure 10 below. Choose OK on the dialogue box.


Figure 10. Compiling Flexfield Definition


Figure 11. Dialogue box for compilation of flexfield structure

Click on OK and the flexfield definition would be saved.

Sunday, March 6, 2011

What are Profile Options in Oracle Apps ?

What are Profile Options in Oracle Apps ?

Profile Options provide flexibility to Oracle Apps. They are a key component of Oracle Applications, hence these much be understood properly. I will be taking multiple examples here to explain what profile options mean. I will also try to explain by stepping into Oracle shoes "How will you design a program that is flexible", by using Profile Options.

Following that, if you still have questions regarding profile options, then leave a comment and I promise to respond. For the learners of Oracle Apps, understanding profile options is mandatory.

What is profile option?
The profile option acts like a Global Variable in Oracle.

Why does Oracle provide profile options?
These are provided to keep the application flexible. The business rules in various countries and various companies can be different. Hence the profile options are delivered by Oracle in such a manner to avoid hard-coding of logic, and to let the implementation team at site decide the values of those variables.

For screenshots of below listed examples in this article, please

Enough definitions, give me some scenarios where profile options are used by Oracle....
1. There are profile options which can turn the debugging on, to generate debug messages. Say one of 1000 users reports a problem, and hence you wish to enable debugging against just that specific user. In this case you can “Turn On” the debugging profile option "again that specific user".
2. There are profile options that control which user can give discount to their customers at the time of data entry. You can set profile option "Discount Allowed" to a value of either Yes or No against each Order Entry user.
3. Lets assume an Organization has department D1 and D2. Managers of both the Departments have "HRMS Employee View" responsibility. But you do not want Manager of D2 to be able to see the list of Employees in Organization D1. Hence you can set a profile option against the username of each of these users. The value assigned to such profile option will be "Name of the Organization" for which they can see the employees. Of course, the SQL in screen that displays list of employees will filter off the data based on “logged in users profile option value”.


Let’s take an example. Let’s assume you are a developer in Oracle Corporation building a screen in ERP. Let us further assume that you are developing an Order Entry screen.
Assume that business requirements for your development work is:-
1. Screen should be flexible to ensure that different users of the screen can give different levels of discounts. For example, a clerk Order Entry User can give no more than 5% discount. But Sales Manager can enter an Order with 15% discount.
2. There should not be any hard-coding regarding the maximum permissible discount.
3. In the screen there will be a discount field.
4. When the discount value is entered in discount field, an error will be raised if user violates the maximum permissible discount.

Here is how Oracle will code this screen
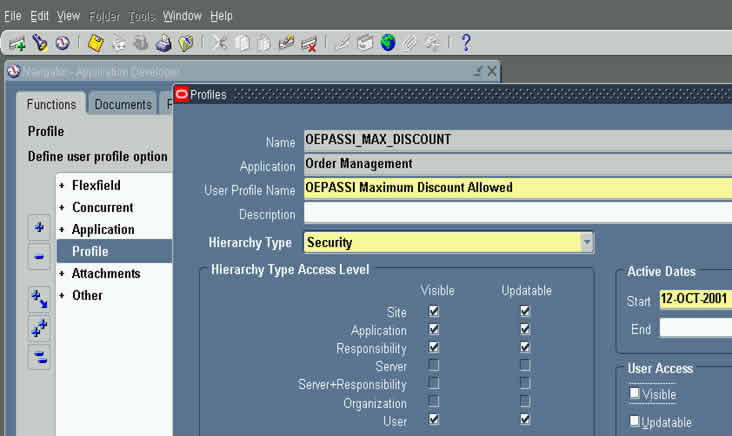
1. They will define a profile option named "OEPASSI Maximum Discount Allowed".
2. The short name of this profile option is "OEPASSI_MAX_DISCOUNT"
2. In the when-validate-item of the discount field(assuming Oracle Forms), following code will be written
IF :oe_line_block.discount_value > fnd_profile.value('OEPASSI_MAX_DISCOUNT')
THEN
message(
'You can’t give discount more than '
|| fnd_profile.value('OEPASSI_MAX_DISCOUNT') || '%' ) ;
raise form_trigger_failure ;-- I mean raise error after showing message
END IF ;

Here is how, the client implementing Oracle Order Entry will configure their system.
1. Navigate to System administration and click on system profile menu.
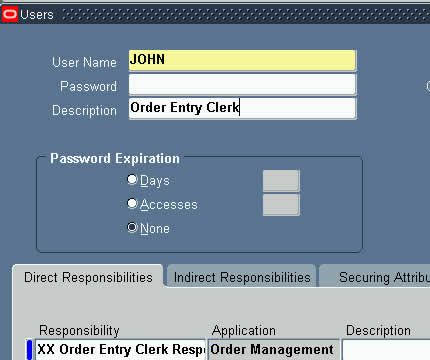
2. For Clerk User(JOHN), set value of profile "OEPASSI Maximum Discount Allowed" to 5
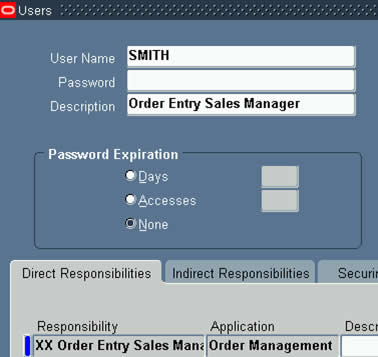
For Sales Manager User(SMITH), set value of profile "OEPASSI Maximum Discount Allowed" to 15


Question: This sounds good, but what if you have 500 Order Entry Clerks and 100 Order Entry Sales Managers? Do we have to assign profile option values to each 600 users?
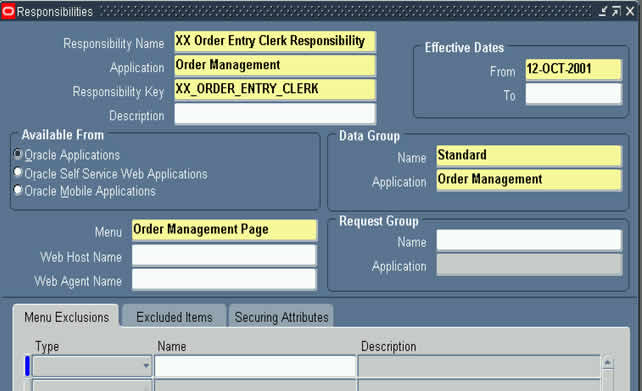
Answer : Well, in this case, each Clerk will be assigned Responsibility named say “XX Order Entry Clerk Responsibility”
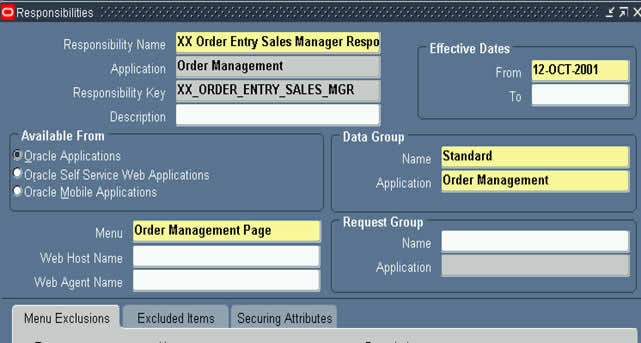
Each Sales Manager will be assigned Responsibility named say “XX Order Entry Sales Manager Responsibility”
In this case, you can assign a profile option value to both these responsibilities.
“XX Order Entry Clerk Responsibility” will have a value 5% assigned against it. However, “XX Order Entry Sales Manager Responsibility” will have a profile option value of 15% assigned.
In the when-validate-item of the discount field, following code will then be written
IF :oe_line_block.discount_value > fnd_profile.value('OEPASSI_MAX_DISCOUNT')
THEN
message(
'You can’t give discount more than '
|| fnd_profile.value('OEPASSI_MAX_DISCOUNT') || '%' ) ;
raise form_trigger_failure ;-- I mean raise error after showing message
END IF ;

Please note that our coding style does not change even though the profile option is now being assigned against responsibility. The reason is that API fnd_profile.value will follow logic similar to below.
Does Profile option value exist against User?
--Yes: Use the profile option value defined against the user.
--No: Does Profile option value exist against Responsibility
-----Yes: Use the profile option value defined against the current responsibility in which user has logged into.
-----No: Use the profile option value defined against Site level.

Profile Options Examples Screenshots

You have reached this page from Profile Options Training Article

Firstly, lets define the responsibility for Clerk, as we discussed in Article.

Next, lets define the sales manager responsibility, as we discussed in Article.


Lets define user JOHN, that is Clerk


And also, lets define user SMITH ( Sales manager )

Now, we need to define the profile option for discount, hence go to responsibility "Application Developer"

When you click on menu "Profile" above, you will then see below screen for defining profile option. Please note that the "Name" field is the short name of profile option, and it is this name used in API call to FND_PROFILE.value


Now, after having defined a profile option, its time to assign these to JOHN & SMITH.
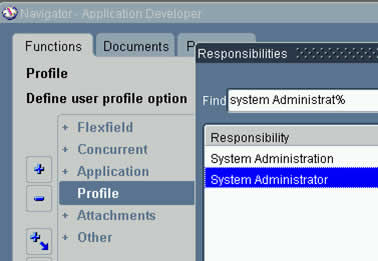
Hence go to responsibility "System Administrator"


Click on Menu Profile/System, as below

The profile option assignment screen looks like below. Enter JOHN in USER, OEPASSI% in Profile, to select profile named "OEPASSI Maximum Discount Allowed"

Assign a value of 5 to the user.


Click on torch, to return to search screen as below


and this time we will assign value of 15 against user SMITH.

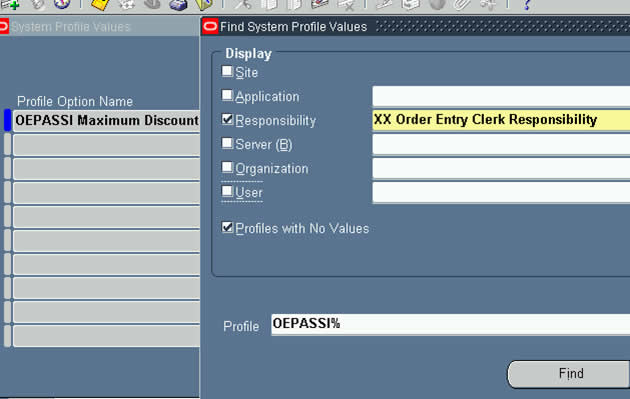
OK, what if we have too many clerks, we can also simply assign profile value to Responsibility of Clerk. Doing so, all the users that use this responsibility, will inherit profile option value against Responsibility.


Assign 5% max discount for Clerks

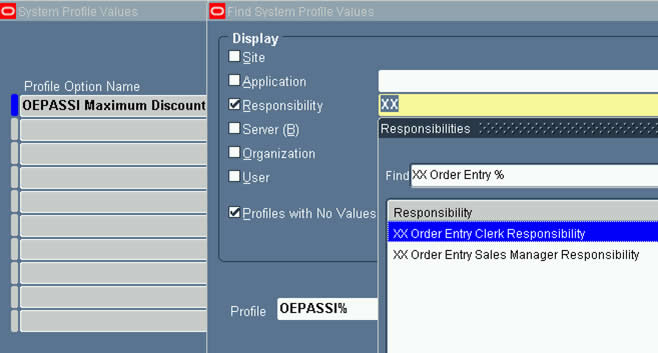
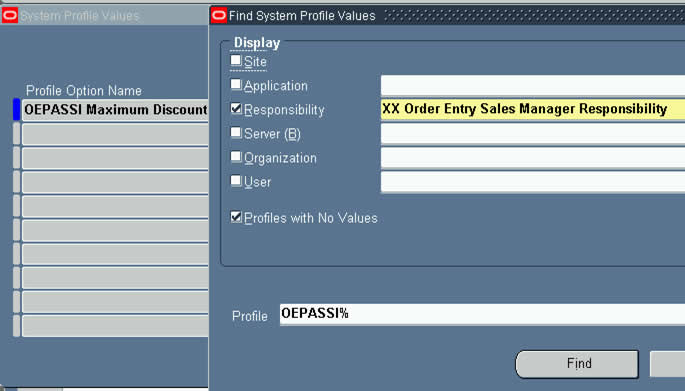
Now, lets select Sales Manager responsibility in profile screen

Search on this...as below......

Assign value 15% to Sales Manager responsibility.


Tuesday, February 8, 2011

Register the Report into Oracle Application

Introduction
To register a Report with Oracle Applications in order to use it in Apps.
  1. Develop the report(.rdf) file as per client requirement by using reports 6i.
  2. move the .rdf file from local machine to server into the respective path
CUS_TOP\11.5.0\Reports\US\ .rdf PO_TOP\11.5.0\Reports\US\ .rdf
  1. Connect to the application and select system administrator create Executable
  2. Executable Name (Any User defined Name)
  3. Application Name(Where the .rdf file located)
  4. Execution Method (Oracle Reports for reports)
  5. Execution File (.rdf file Name)
  6. Create Concurrent program and attach 1)Executable
  7. Parameters
  8. Incompatible Programs
  9. create Request Group attach Concurrent Program
  10. Create responsibility attach
    1. Request Group
    2. Menu
    3. Data Group
  11. Create User Attach Responsibility to the User
  12. User will submit the request from SRS (Standard Request Submission) Window
SELECT user_id UserID, user_name UserName, creation_date Cdate FROM fnd_user Executable = System Administrator => Concurrent = > PRogram =>Executable Concurrent Program = => Concurrent = > Program => Define Request Group = => Security = >Responsibility => Request responsibility = => Security = >responsibility => define user = =>Security =>User =>Define SRS Window = View=>Requests=>Submit New Request => OK =>Select Program Name =>Click Submit Button Press NO =>Select find Button =>
  1. Click View output button to open the output file.
  2. Click View Log button to open the log file.

1.we will develop the report through report 6i.
2.we will move that report from local machine to oracle apps server
for example if it Po module the path is
PO/11.5/reports/us/xx.rdf
3.we will create exectuable from sysadmin responsiblity.
4.we will create concurent program from sysadmin responsiblity and attch exectable incompatabilites parameters.
5.we will create request group and attach concurent program.
6.we will create responsiblity and attach request group.
7.we will attch responsilty to user .
8.user will sumbit concurent program from srs window.
We will modify
pre_form trigger when_new_form_instance app_custom package we need to change in template.fmb